
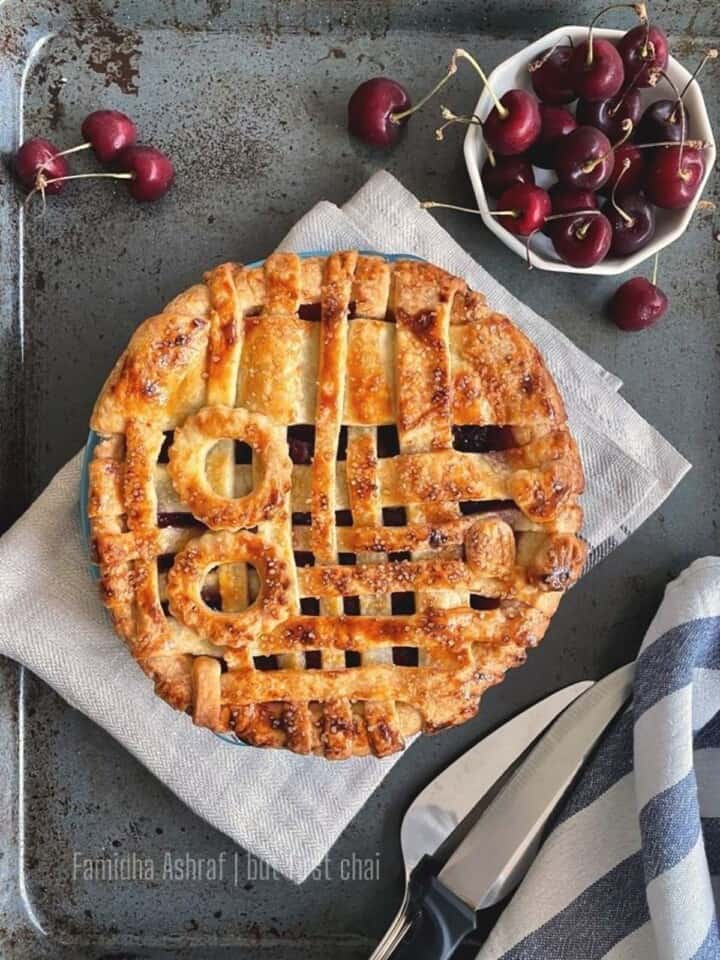
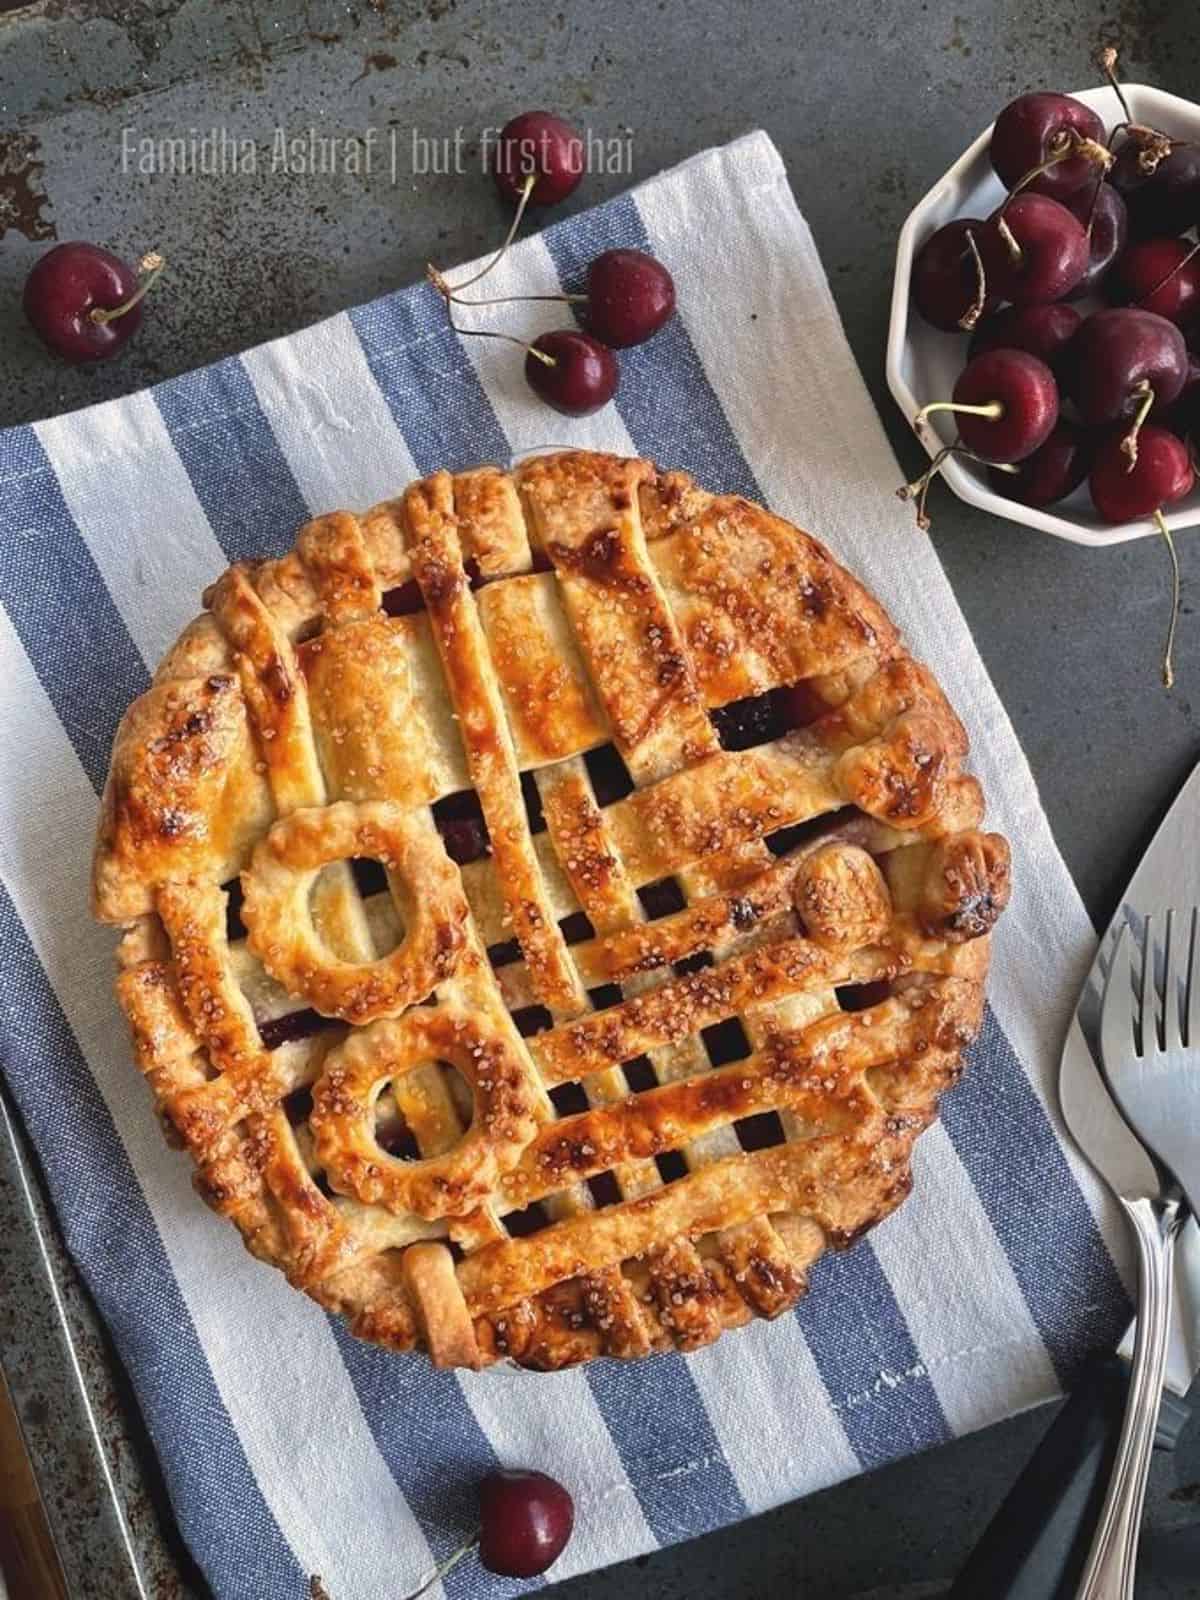
A perfectly sliceable 7-inch fresh cherry pie baked with sweetened cherries in a flaky all-butter pie crust and a rustic lattice to celebrate our marriage. 🙂
I had decided not to make any desserts for the occasion because we binge-watched Gilmore Girls and binged on doughnuts and pizzas! Has that happened to you? Watch a series, and you want to eat the same things they eat? After that, we don't deserve any more sugar or junk food! But this is the season of cherries!
Just a day before the anniversary, a man came to our door and requested that we help him by buying his box of cherries. They were Lebanese cherries and looked so fresh and juicy! I didn't have a second thought - cherry pie it is! But, is this how the "Universe conspires"? Or is this "What you resist persists!" 😂
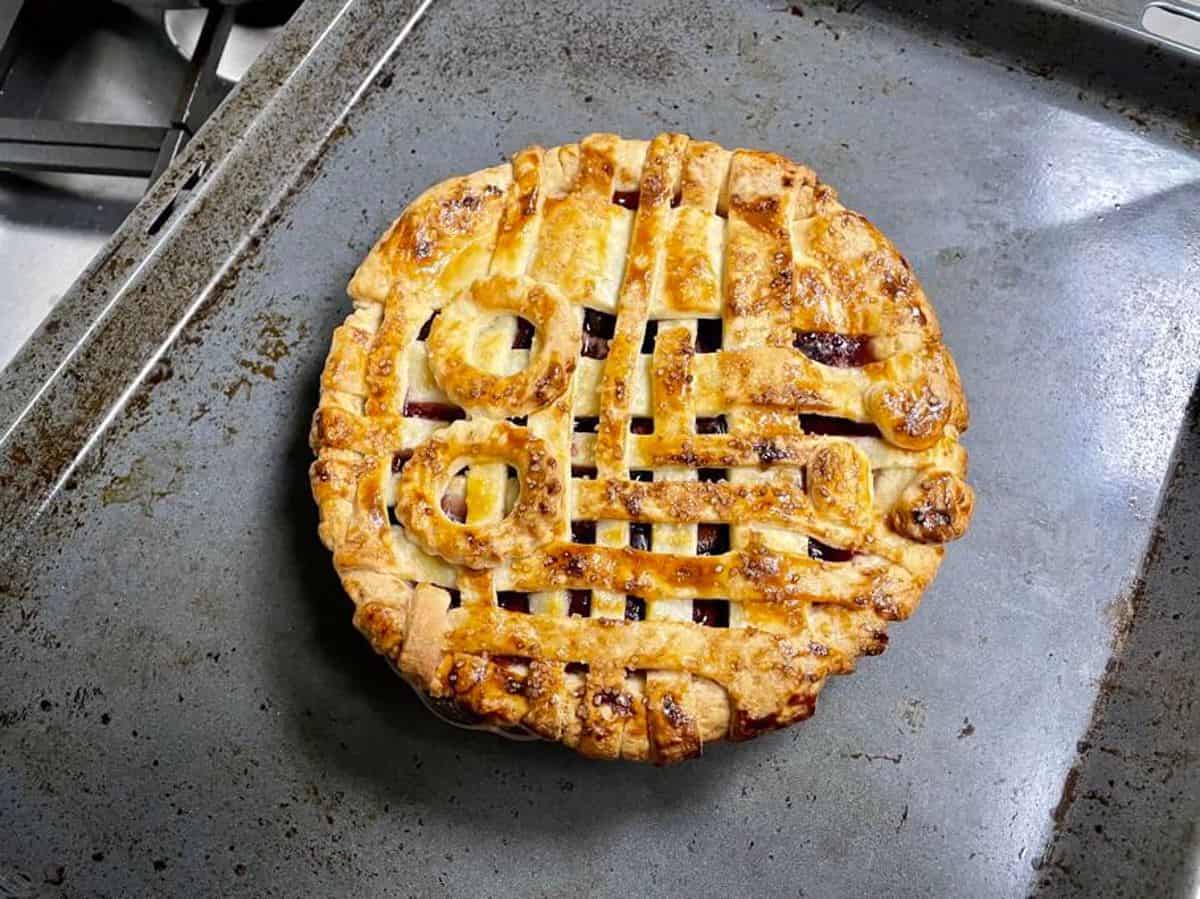
I used my apple pie crust recipe, but the highlight here is my attempt at a lattice crust. It could have been better, but I loved the number 8 I made using cookie cutters. 😜 Sad news, not a single person noticed the "8" when I shared it on Instagram. 😭
Jump to:
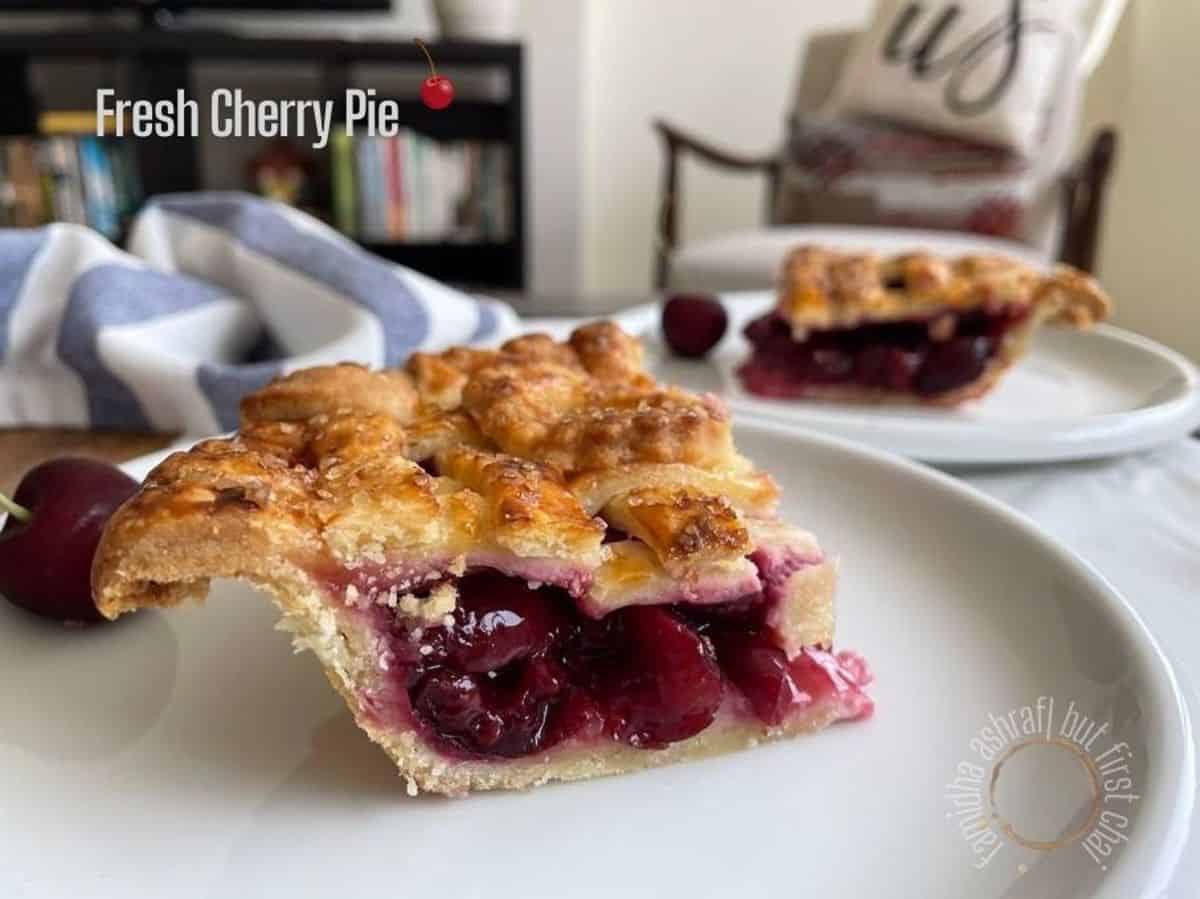
From my apple pie attempt, I learned a pie has to cool for a minimum of 3 hours so you can slice without too much runny filling. When I sliced this cherry pie after 3 hours, it still had some runny juice, but it was not as bad as my apple pie. I cling-wrapped the rest and sliced them the next day, and they were perfectly sliceable without any visible runny juice. So I would suggest resting on this pie for at least 5 hours. This also depends on the cherries used, as some are juicier than others.
Ingredients
To make a fresh cherry pie, you will need these ingredients:
- all-purpose flour
- sugar
- salt
- butter
- ice cold water
- fresh cherries
- cornflour /starch
- lemon juice
- vanilla extract
- almond flour (optional but recommended)
- egg
- cream or milk
- demerara sugar or sanding sugar
See recipe card for quantities.
Instructions
To make a fresh cherry pie from scratch, you will need to follow a sequence of steps:
- make the pie crust dough, divide into two portions, cling wrap and chill or freeze
- pit the cherries and prepare the pie filling, and chill
- roll one dough, line the pie dish, fill it with the cherry pie filling and chill
- roll the next dough, cut it into strips, place artistically over the pie dish, chill
- Preheat the oven and bake the pie until golden (you most probably will need a pie shield)
- take out of the oven and let it cool for 4 to 6 hours
- Slice using a serrated knife and serve
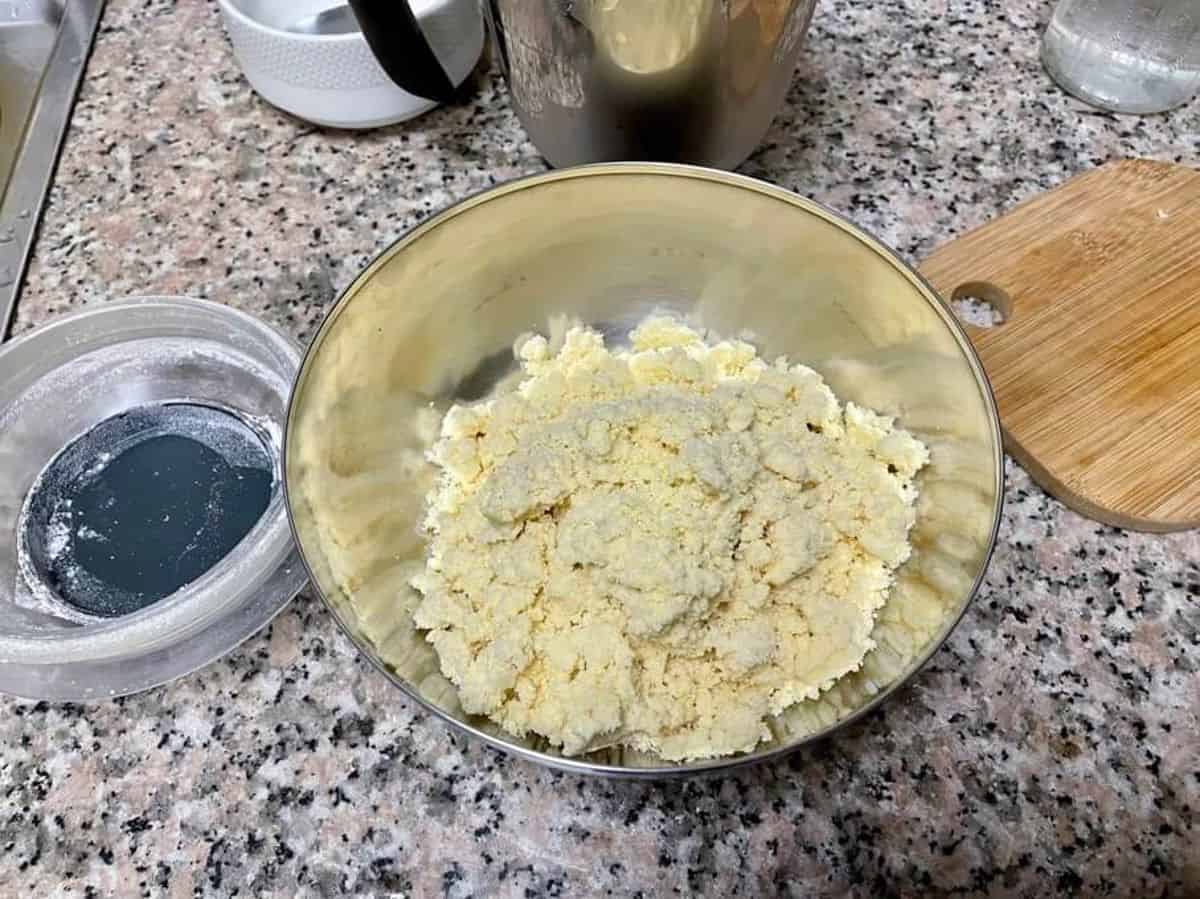
To prepare the pie crust, start by adding the chilled flour, sugar, and salt into a mixer or a food processor. Pulse until the ingredients are combined. Next, add the solid butter cubes. Pulse again until you achieve a texture resembling coarse crumbs with pea-size butter pieces. Now, gradually add the ice-cold water a little at a time between pulses, just until the dough starts to come together.
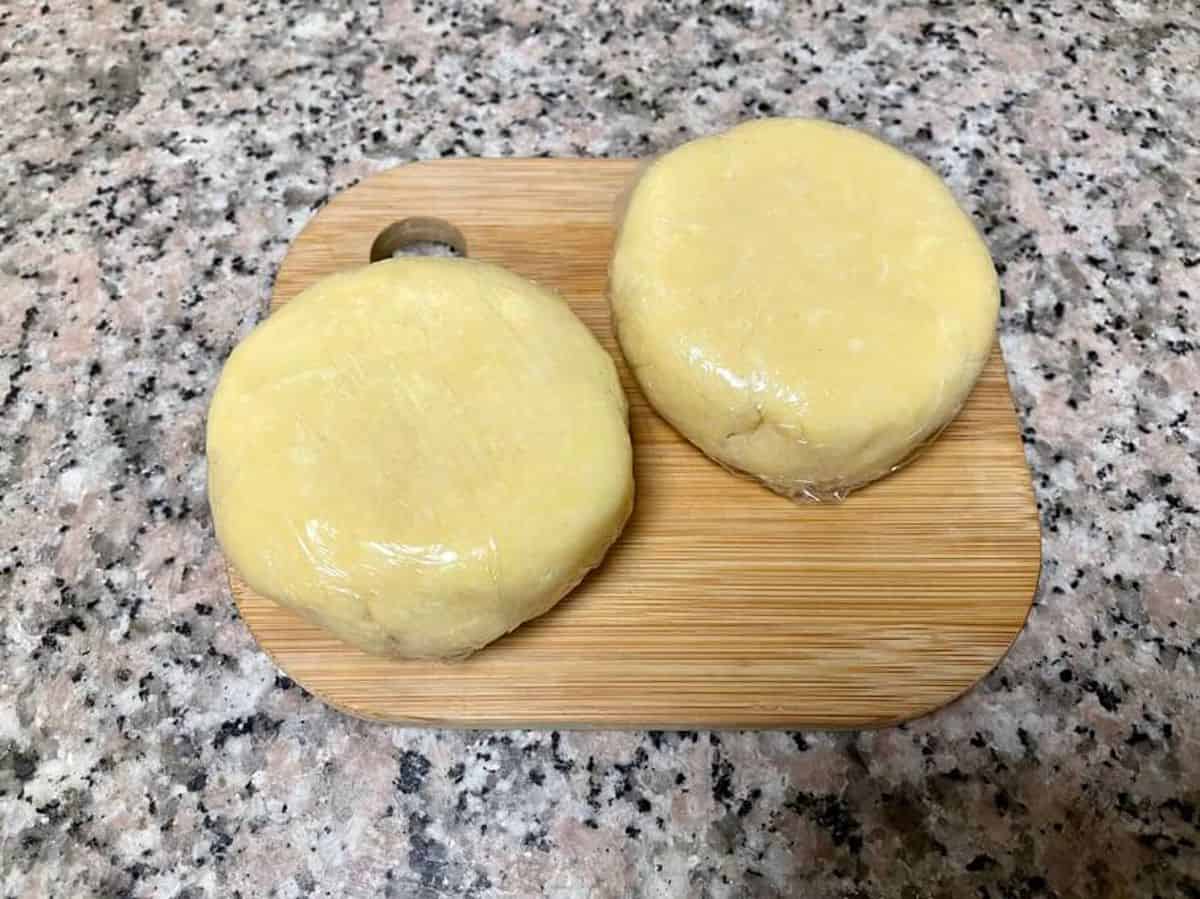
Transfer the dough onto a work surface and gather it without kneading, forming it into a ball. Divide the dough into two equal portions and flatten each into an inch-thick disk. Wrap them in cling wrap and refrigerate for at least an hour or overnight.
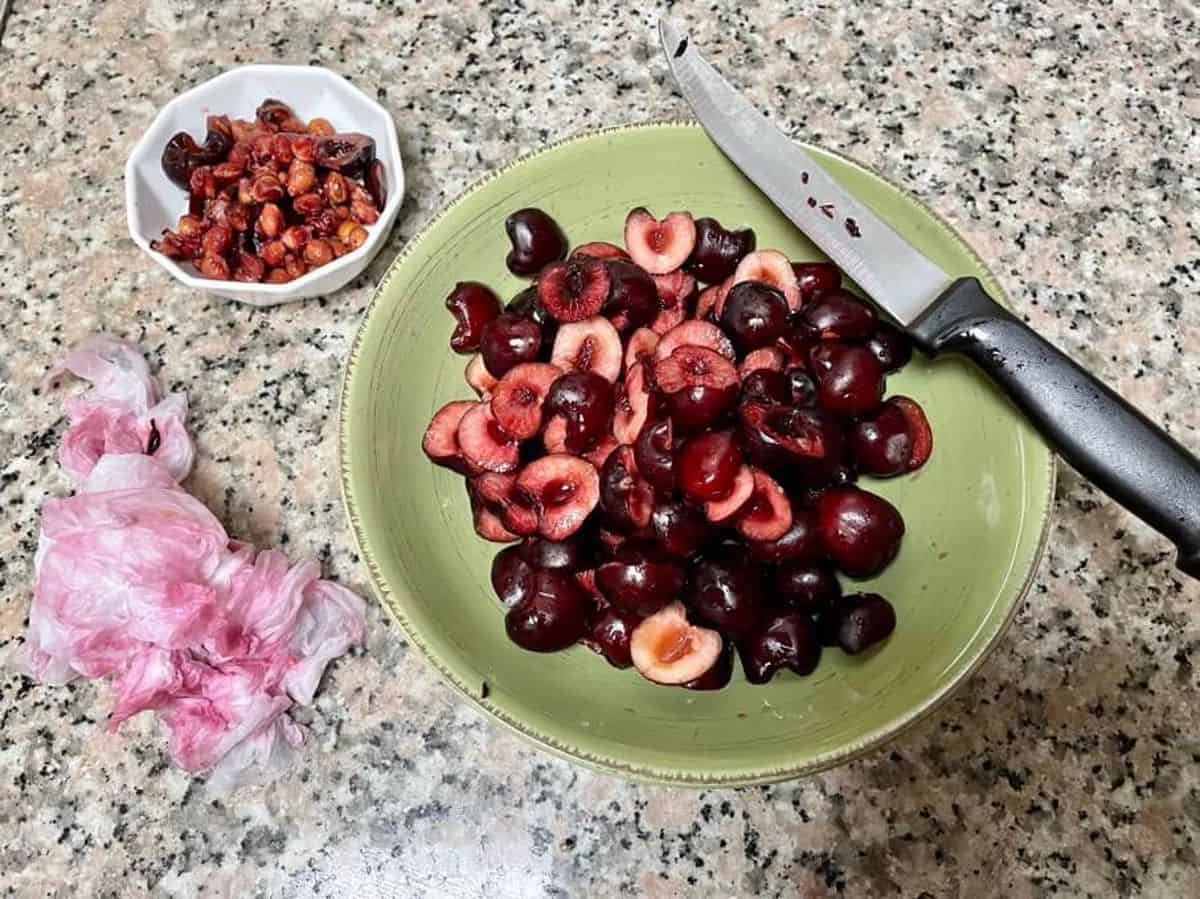
After preparing the pie crust, the only time-consuming step is pitting the cherries. If you don't have a cherry pitter, a knife works well. Slice the cherry along the middle, twist to open, and use your thumb to remove the seed. It is similar to slicing an avocado or a stone fruit.
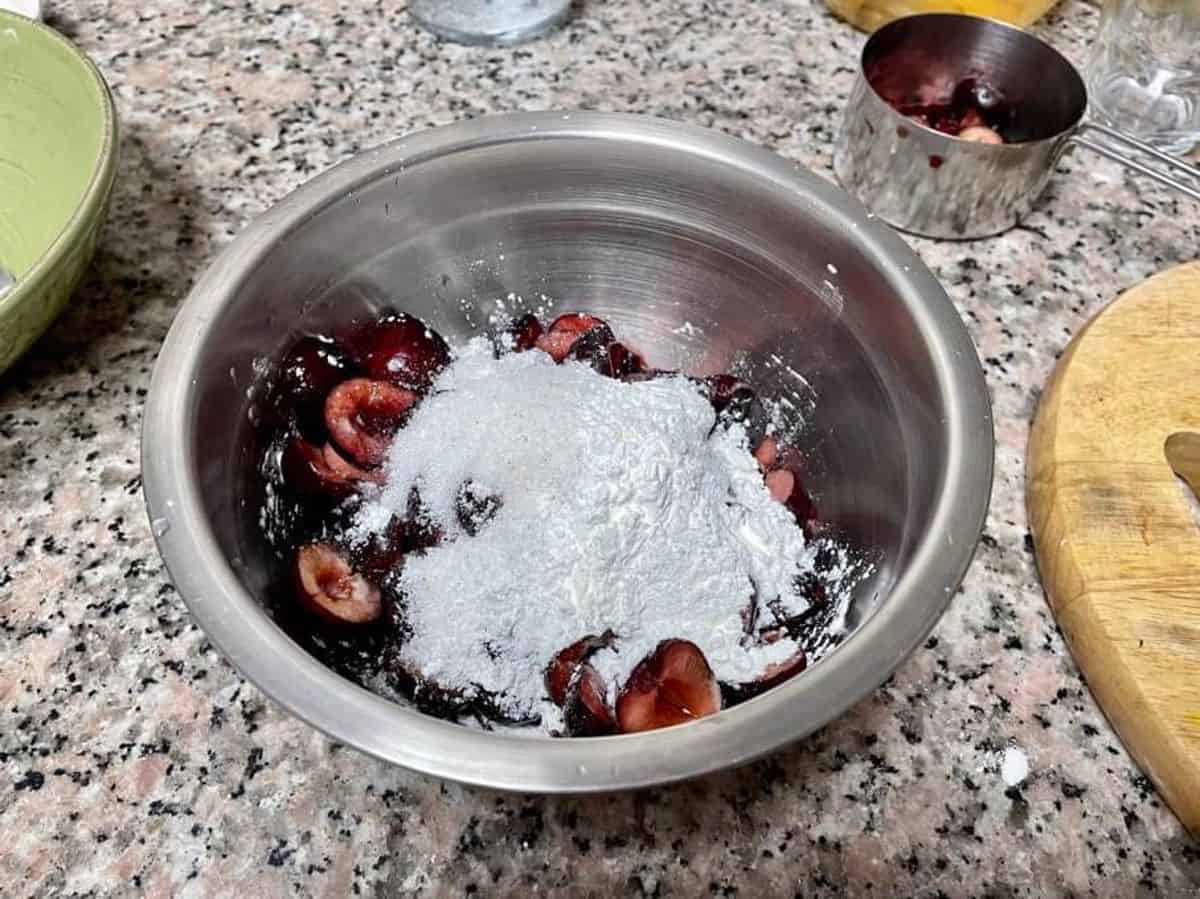
Take a large bowl and prep cherries, sugar, cornflour/starch, lemon juice, vanilla, and almond flour and stir this until combined. Cover and place in the refrigerator until needed or for up to 24 hours.
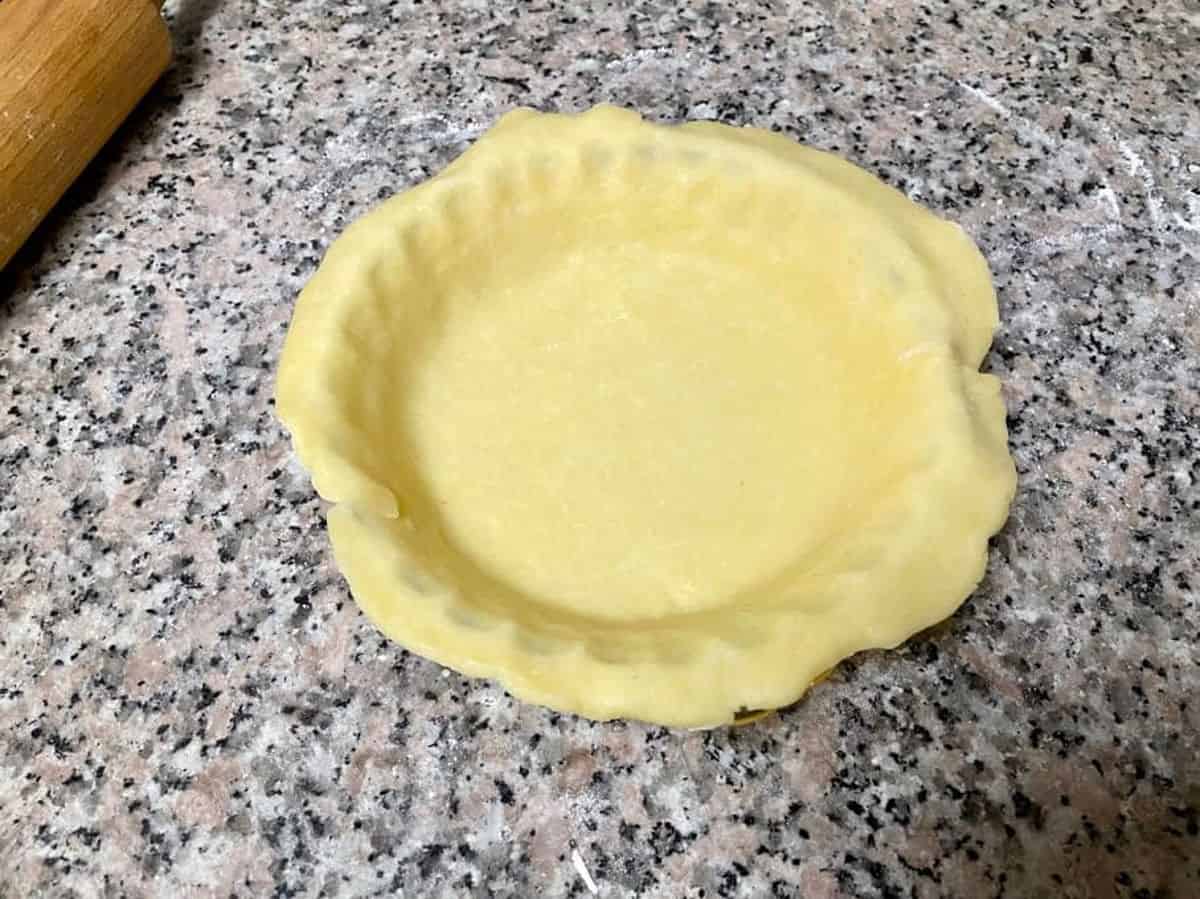
Once you have rolled out the dough, carefully place it into the pie plate. Gently press the dough to the bottom and sides of the dish, making sure it overlaps the edges to prevent shrinkage during baking. Spoon the chilled cherry filling onto the dough, covering the base and piling it up slightly. Add a few pieces of cold butter over the filling and refrigerate until ready to proceed.
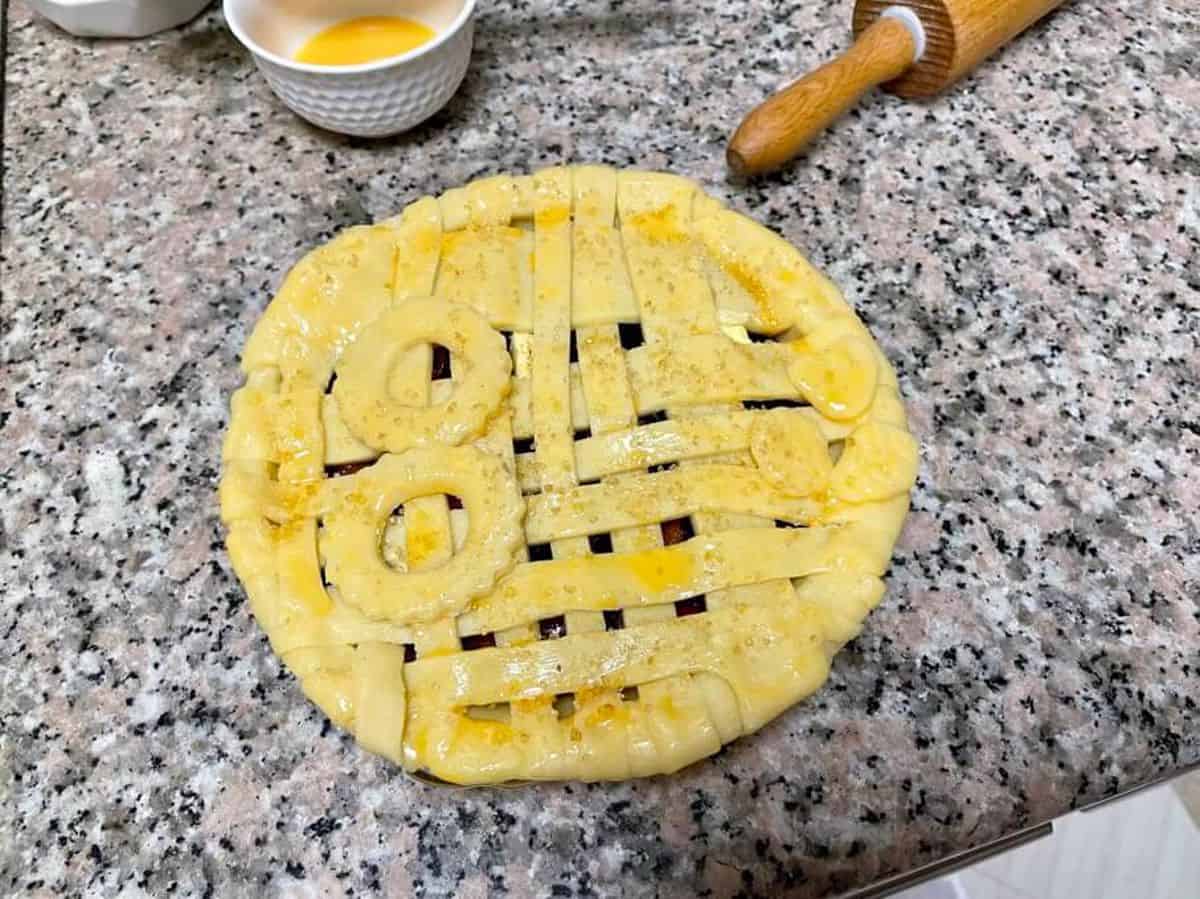
Read the recipe card for details on how to make lattice. Preheat the oven to 200℃. Brush the pie with the egg wash and sprinkle sugar on top.
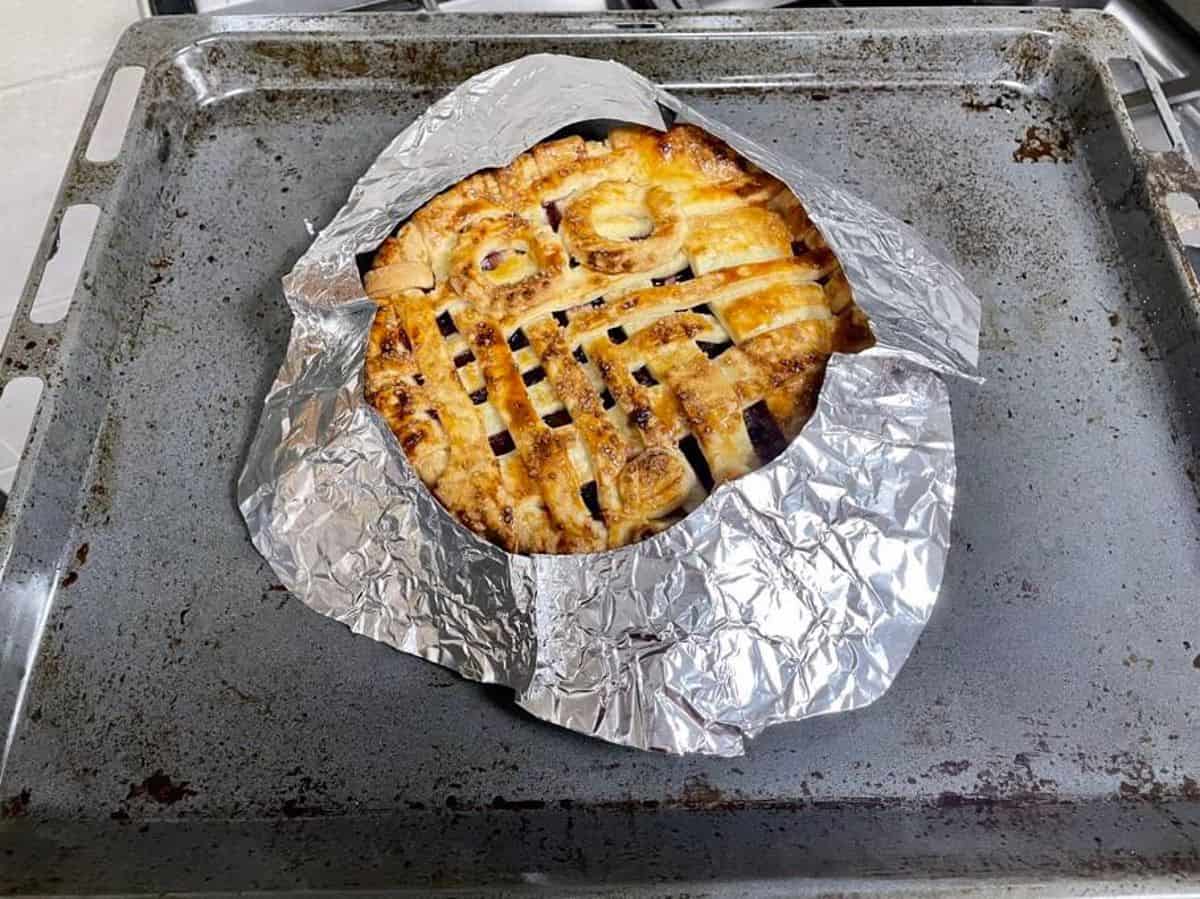
Set the pie on a baking sheet and bake for 20 minutes on the middle rack. Then, reduce the temperature to 190℃, cover the pie with the foil crust shield, and bake for another 30 minutes (or until the crust turns golden brown and the cherry juices bubble).
Once baked, take the cherry pie out of the oven and transfer it to a cooling rack. Allow it to cool for a minimum of 4 to 6 hours before slicing and serving. Slicing it earlier may result in a runny filling. For even firmer slices and no runny juice, the pie can be enjoyed even better the following day.
Hint: Lattice or weaving the pastry strips needs a bit of patience, some coordination skills and logical thinking. I watched a few Lattice weaving videos and thought, "Ah, that's easy!" but when it was time to do the action, I panicked and messed up. You can't keep correcting the weave because you risk the dough getting all greasy. Make sure to read or watch the links I have included in the recipe section to get your pie game up.
Top Tips
- You can test if the pie dough is ready by pinching some in your hands-if it holds together, it's good to go. If not, add a dash of ice-cold water and pulse again.
- Keep in mind that visible bits of butter in the dough are desirable, as they will melt while baking, resulting in delightful flaky layers in your pie crust.
How to roll pie crust?
Once you have rolled out the pie dough, carefully place it into the pie plate. Gently press the dough to the bottom and sides of the dish, making sure it overlaps the edges to prevent shrinkage during baking. Spoon the chilled cherry filling onto the dough, covering the base and piling it up slightly. Add a few pieces of cold butter over the filling and refrigerate until ready to proceed.
Storage
Cover any leftover cherry pie and keep it at room temperature for a day or refrigerate it for no longer than 5 days.
FAQ
I have not tried using dried cherries in pie filling, but I am sure it would need to be rehydrated to make it soft and plump. Dried cherries can be used in equal parts for fresh cherries. Soak the dried cherries in warm water in the refrigerator for 8 to 10 hours and then use them in the pie filling recipe.
Once you have the pie crust ready, the only time-consuming task is pitting cherries unless you own a cherry pitter. I wish I had it, but a good knife will do that job well, too. I use the same method of slicing an avocado or any stone fruit like a peach or nectarine, to pit the cherries. Yes, it is time-consuming, but way less messy and way neater cuts. So, slice along the middle of the cherry, twist and open, and use your thumb to remove the seed.
Related
Looking for more fresh cherry recipes?


📖 Recipe Card

Fresh Cherry Pie (7-inch)
Equipment
- 7-inch pie dish
Ingredients
For the Pie Crust: (makes enough for 1 double-crust 7-inch pie)
- 1⅓ cup all-purpose flour, chilled
- ½ tablespoon sugar
- ¾ teaspoon salt
- 125 grams butter, solid cold cut into half-inch cubes
- ¼ cup water, ice cold
For Cherry Pie Filling
- 3 cups pitted cherries, halved or quartered
- ¼ cup sugar
- 2 tablespoon cornflour, cornstarch (see notes)
- 2 teaspoons lemon juice
- ½ teaspoon vanilla extract
- 1 tablespoon almond flour, (optional but recommended)
- 10 grams butter, cut into small pieces
For the Egg Wash
- 1 egg, (whole or yolk)
- ½ tablespoon milk, or cream
For Garnish
- sanding sugar, optional
Instructions
Prepare the pie crust:
- Add the chilled flour, sugar and salt into a mixie or a food processor. Pulse it a few times until combined.1⅓ cup all-purpose flour chilled½ tablespoon sugar¾ teaspoon salt
- Next, add the very cold and solid butter cubes and pulse again 5 to 8 times or until they resemble coarse crumbs with pea-size butter pieces.125 grams butter solid cold cut into half-inch cubes
- Now, add the ice-cold water a little at a time between pulses just until it starts to come together. If the dough holds together when you pinch some in your hands, then it is ready. If it does not then add a dash of ice-cold water and pulse again.¼ cup water ice cold
- Transfer the mixture onto the work surface and gather the mixture to form a ball without "kneading".
- Divide the dough into two equal portions (roughly), flatten each to an inch-thick disk, cling wrap and refrigerate for at least an hour or overnight. You will see bits of butter on the dough which will melt as the crust bakes creating flaky layers. So, visible pieces of butter are a good thing you should aim for in this dough.
Prepare the cherry filling:
- Take a large bowl and prepped cherries, sugar, cornflour/starch, lemon juice, vanilla, and almond flour and stir this until combined. Cover and place in the refrigerator until needed or for up to 24 hours.3 cups pitted cherries halved or quartered¼ cup sugar2 tablespoon cornflour cornstarch (see notes)2 teaspoons lemon juice½ teaspoon vanilla extract1 tablespoon almond flour (optional but recommended)
Roll out the crust:
- When you are ready to roll the dough, remove one dough disc from the refrigerator and let it sit on the counter for 5 to 8 minutes or more depending on the weather. This will make it easier to roll without cracks.
- Dust the counter with flour and start rolling from the centre and work your way out, turning (not flipping) the dough carefully with your hands as you go. Spread the dough large enough to cover the depth and sides of the 7-inch pie dish. Also, now is the time you should use the pie dish to cut out your foil pie crust shield.
Line the pie dish:
- Carefully place the rolled-out dough into the pie plate.
- Lightly press it to the bottom and sides of the pie dish (ensure the dough overlaps the edge to prevent shrinkage while baking).
- Spoon the chilled cherry filling covering the base and mount the excess. Place a few pieces of cold butter over the filling and refrigerate until needed.10 grams butter cut into small pieces
Make the lattice:
- Remove the other disk of chilled pie dough from the refrigerator and let cool for a few minutes.
- Roll the dough into a circle similar to the size of the pie dish.
- Using a sharp knife, or pizza cutter, cut the dough into strips of any size. It can be all of the same width or different widths. Take out the pie dish from the refrigerator and quickly thread the strips over and under one another to resemble a "basket weave".
- Trim any excess and make sure to press the edges of strips with the bottom pie crust to firmly seal the pie. Flute or crimp the edges to make the pie look even prettier. With the trimmed dough, I used a cookie cutter to make an 8 design.
- Chill the pie until the oven is preheated.
Bake the fresh cherry pie:
- Preheat the oven to 200℃.
- Make the egg wash by whisking the egg or yolk with milk or cream. Brush the pie with the egg wash and sprinkle some sugar all over the top.1 egg (whole or yolk)½ tablespoon milk or cream
- Place the pie on a baking sheet and bake for 20 minutes on the middle rack.
- Reduce the temperature to 190℃, place the foil pie crust you made over the pie and continue to bake for another 30 minutes or until the crust is golden brown and you can see the cherry juices bubbling.
Cool the baked cherry pie:
- Remove the baked cherry pie from the oven and place it on a cooling rack.
- Let it cool for at least 4 to 6 hours before slicing and serving. The filling will be runny if you slice it any earlier. The pie firmed up even better the next day so there was no runny juice in our second-day slices.
Slicing the pie:
- The first piece of pie is always the toughest to get out of the pie dish without making a mess. Use a sharp serrated knife to slice through the crust and make sure you have cut through the bottom crust too.
- Use an offset spatula to dig out the piece. Read more on how to slice a pie in this food52 article.
Store leftovers:
- Cover the leftovers and keep at room temperature for a day or refrigerate them for no longer than 5 days.
Notes
Nutrition Info
Nutritional information is an estimate provided for informational purposes only. Values may vary based on ingredient brands, cooking methods, and portion sizes.
The recipe was adapted from Sally's fresh cherry pie.


Famidha Ashraf says
Buttery crust, juicy cherries, and that sweet summer aroma...this pie is pure joy! Bake it soon and tell me how yours turned out.