
You know how sometimes you just want to serve something extra special, but without all the fuss? This Chicken Tikka Biryani has become one of my go-to recipes when I want to wow the family-it's packed with flavour and surprisingly easy to put together. If you've been looking for that perfect balance between homestyle comfort and a restaurant-style finish, I think you're going to love this one!
Nowadays, you can have biryani anytime the cravings hit because food delivery is just a click away. But we all know homemade food always wins, and with a bit of planning, you can easily make the best chicken tikka biryani for a lazy Sunday lunch or dinner.
Jump to:
🍲What is Chicken Tikka Biryani?
It is a rice dish made with succulent boneless chicken pieces in a spicy tikka masala topped with fragrant basmati rice. This is how I see it-When your favourite chicken tikka masala (British?) rests under aromatic parboiled basmati rice and is sealed to dum cook, you have a tikka biryani!
The chicken is marinated in a blend of hung curd and ground spices, then grilled in the oven or cooked until tender. Next, it is nestled into a spicy onion-tomato-based tikka masala, layered with partially cooked rice infused with whole spices. Sealed and dum-cooked to perfection, this biryani is packed with flavour.
🛒Ingredients
Here is a list of ingredients to make my spicy recipe.
- boneless chicken thighs or breast
- labneh or hung curd or Greek yoghurt
- ginger garlic paste
- lime juice
- Oil: You will need mustard oil, ghee and sunflower oil.
- Ground spices: You will need Kashmiri red chilli powder, regular red chilli powder, coriander powder, turmeric powder, cumin powder, pepper powder, kasuri methi and my garam masala.
- Whole spices: I have used green cardamom, cloves, bay leaves, cinnamon sticks and caraway seeds.
- Produce: You will need red onions, green chillies, tomato, coriander (cilantro) leaves and mint leaves.
- basmati rice
- Saffron strands, rose water or kewra water for flavour
- fried onions
Refer to the Recipe Card at the bottom of this page for a complete list of ingredients and quantities.
🔪Steps to Make Tikka Biryani
I like to keep an order of the cooking process so it is easy to navigate. So, here is how I organize and make this delicious chicken tikka masala biryani easily in stages:
- Marinating and grilling (or pan-roasting) the boneless chicken pieces.
- Preparing the tikka biryani masala and infusing smoked flavour.
- Par-boiling the basmati rice (al dente).
- Assembling the biryani pot for dum cooking.
Please scroll further down for the print version of the Recipe card.
⏲️Before you start, have the saffron-infused milk (or water) and the fried onions ready.

Marinate
In a bowl, combine the boneless chicken thighs with marinade ingredients. Mix well to coat the chicken evenly. Cover and refrigerate for at least an hour or overnight.

Grill
Skewer and grill the marinated chicken using an oven or stove-top grill pan. The recipe card has details. You can also refer to my chicken tikka kebab recipe for more detailed instructions.
⏲️While the chicken is getting done, rinse the basmati rice until water runs clear and soak it in clean water for 10 to 15 minutes. Then start with the tikka masala prep.

Prepare tikka masala
I like to prepare the tikka masala in a pot big enough to hold my entire biryani. Cook the aromatics by sauteing with ground spices and salt until softened. Pour in whisked yoghurt and simmer until the oil surfaces.
Lastly, add kasuri methi, garam masala, chopped coriander leaves and all of the cooked chicken. Mix them thoroughly. Cook on low heat for 3 to 5 minutes until the oil resurfaces. Turn off. This is essentially a tikka chicken curry!
⏲️While the masala is getting done, prepare charcoal for smoky flavour infusion and also get a pot of water boiling for the rice.

Dhungar for smoky flavour
Heat a small piece of charcoal over a gas flame until red hot. Make a DIY foil bowl and place it over the biryani. Add a teaspoon of ghee, and drop in the hot charcoal using tongs. Cover immediately to trap the smoke, let it sit for 10-12 minutes, then discard the foil and keep the pot covered.

Par-boil the rice
To the pot of boiling water, add the whole spices. Don't forget to generously season with salt. Since we're parboiling the rice, it's essential to add more salt than usual to ensure the rice absorbs enough seasoning.
Now, add the drained basmati rice and bring it back to a full boil on high heat. Check after 5 to 6 mins; the rice should be 90% cooked, slightly firm but tender. Drain the biryani rice immediately using a fine mesh strainer to stop cooking.
🍲Assemble the biryani pot
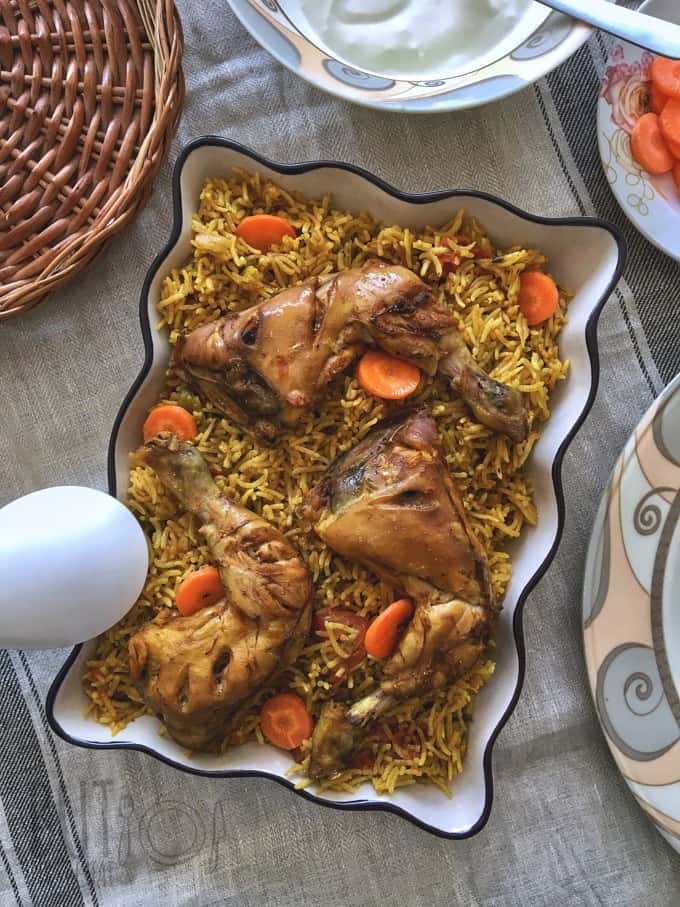
I made the tikka biryani masala in the pot I intent to dum the biryani. I do the dishes so work smart, not hard! Now, all you have to do is scatter the drained par-boiled rice over the tikka masala.
Drizzle the prepared saffron-infused water or milk and rose water. Sprinkle garam masala, fried onions and chopped coriander leaves. Add a few dollops of ghee and seal the pot with foil and then the lid.
Your biryani pot is ready for dum cooking.
Tip: If you are making a large quantity of rice, then it is better to add it in layers. A layer of rice followed by the aromatics. Repeat one or two more times and finish with the aromatics on top.
🍲Dum cook
Place a heat diffuser over a low flame on a large hob, then position the biryani pot on top. Allow it to steam cook for approximately 10 minutes before switching off the heat. Avoid opening the pot immediately; instead, keep it covered for an additional 10 minutes.
Utilize this time to prepare a bowl of raita or fry papadums.
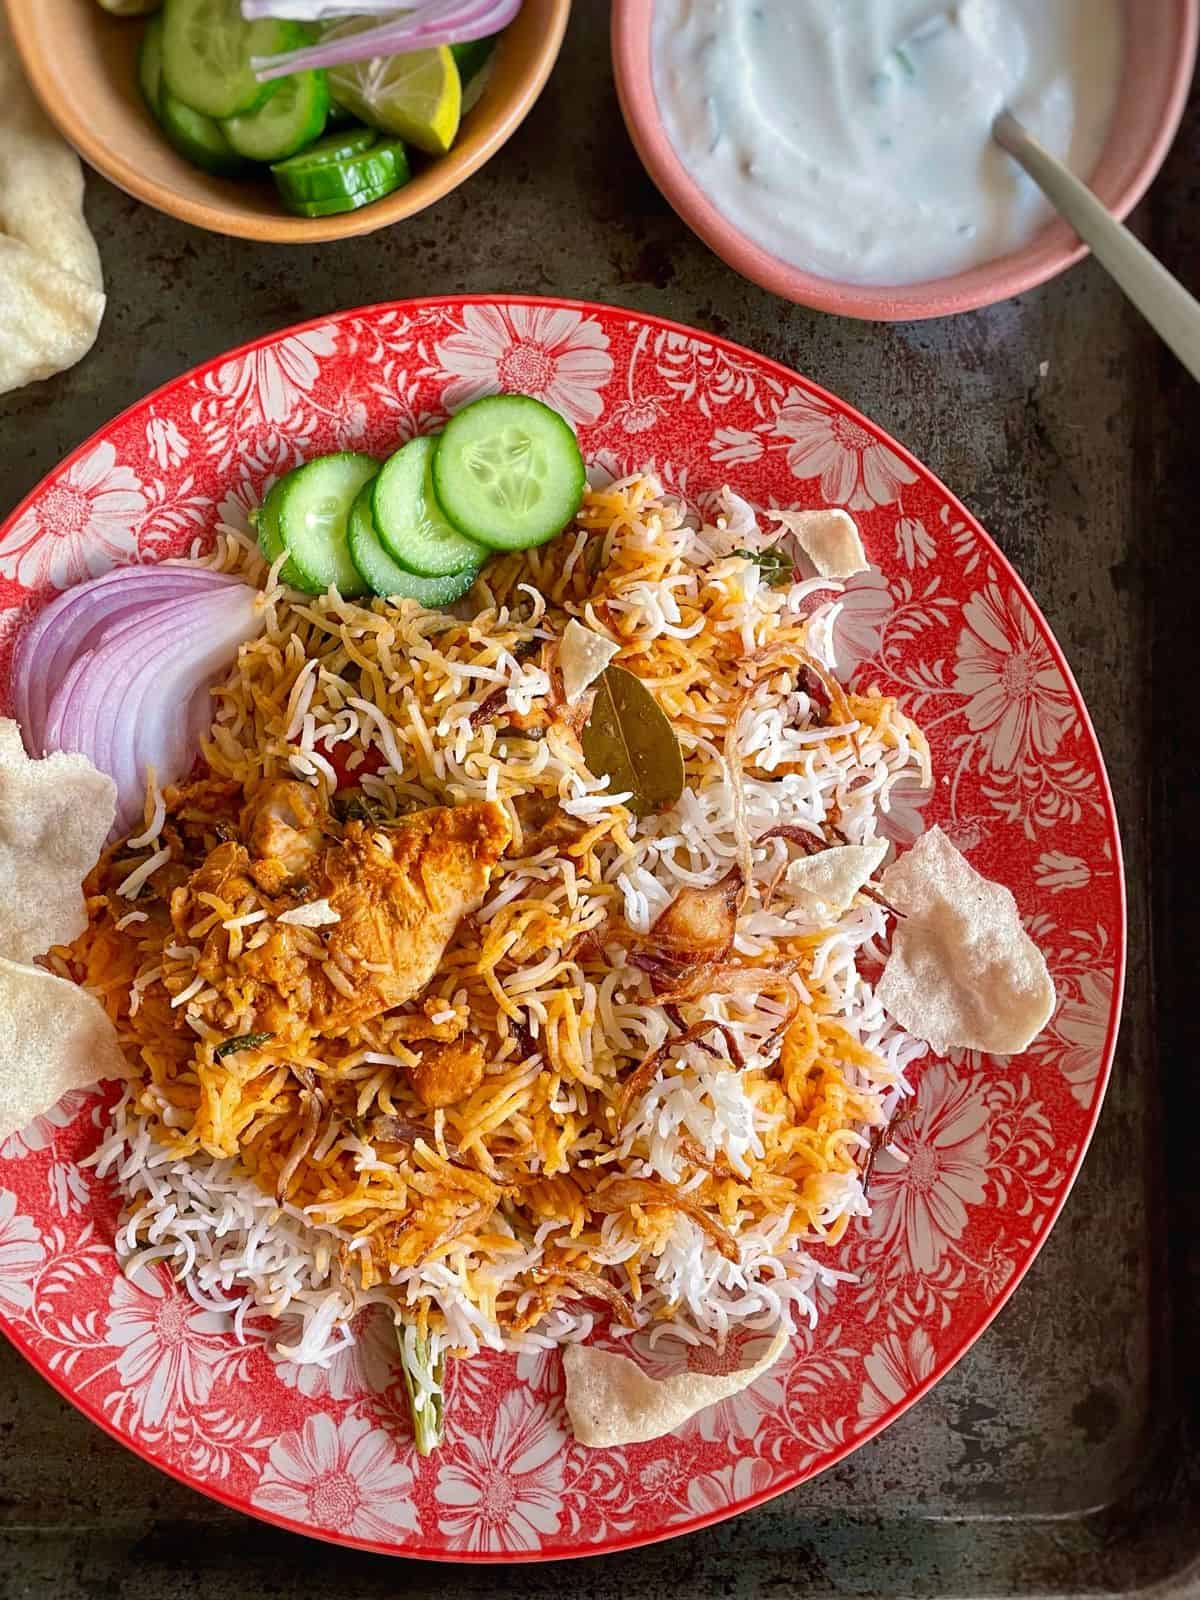
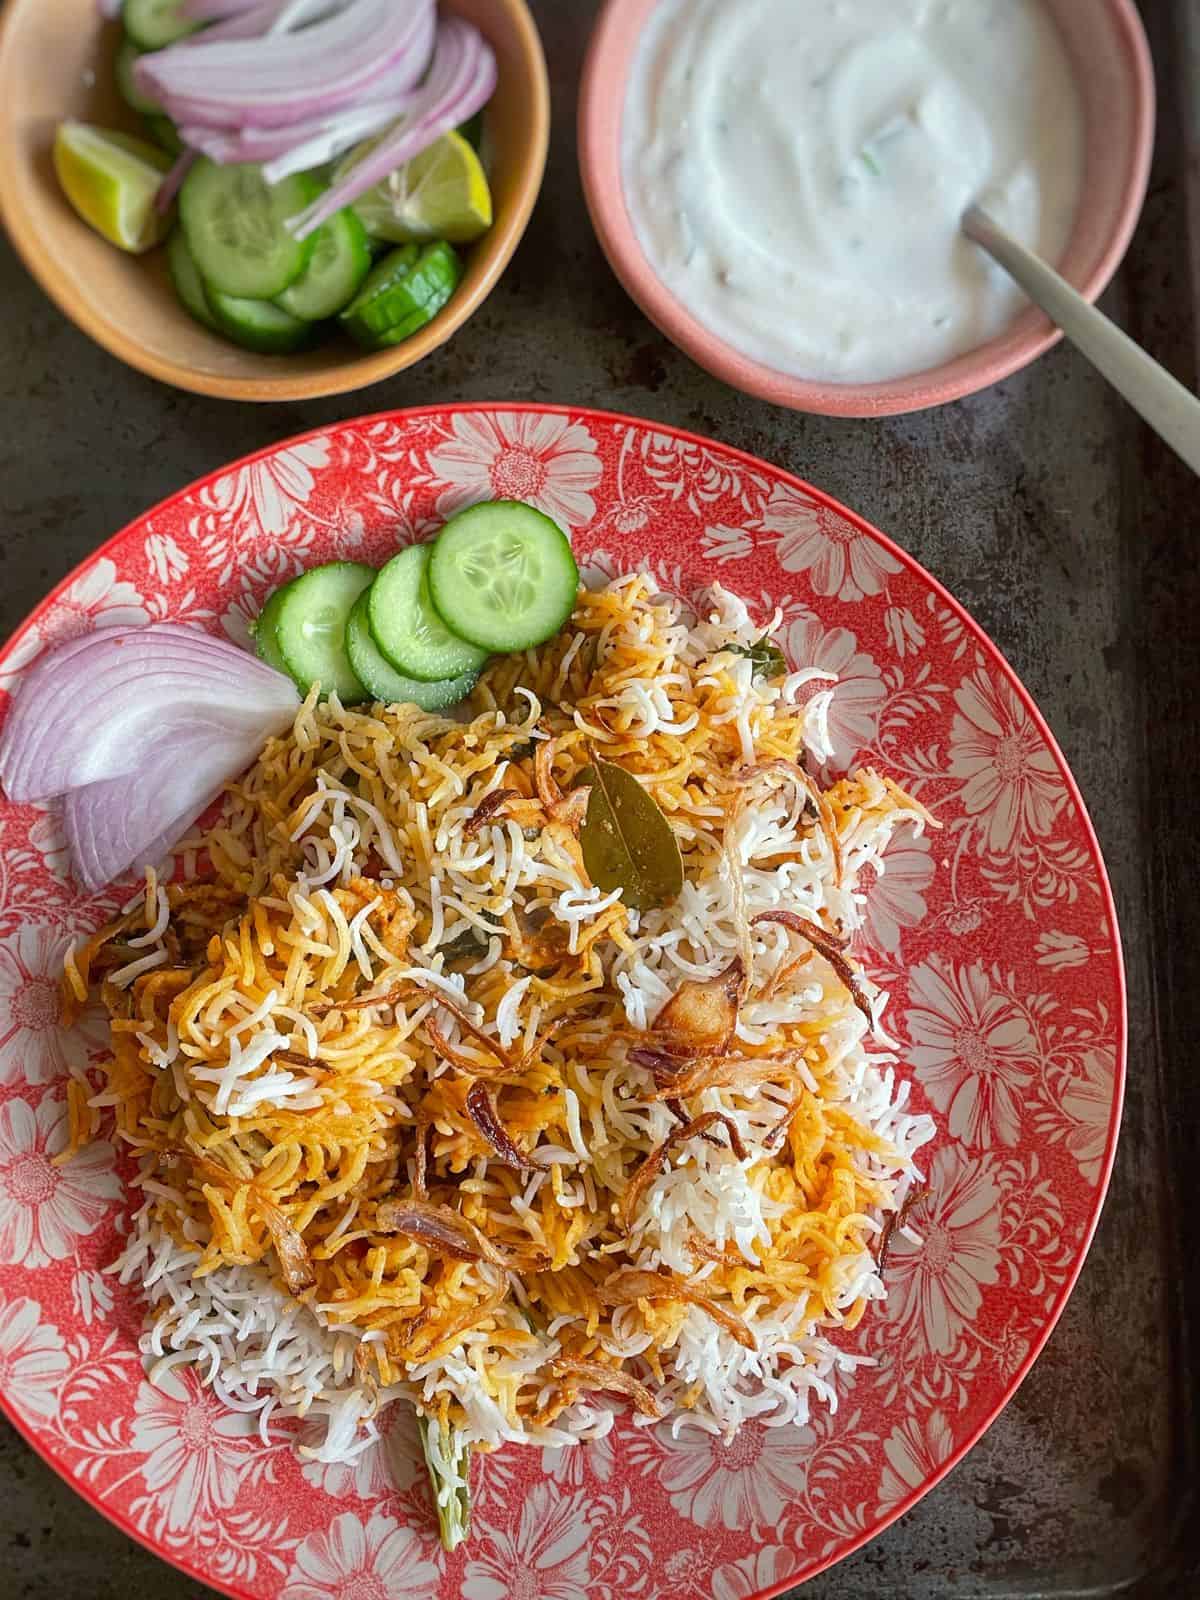
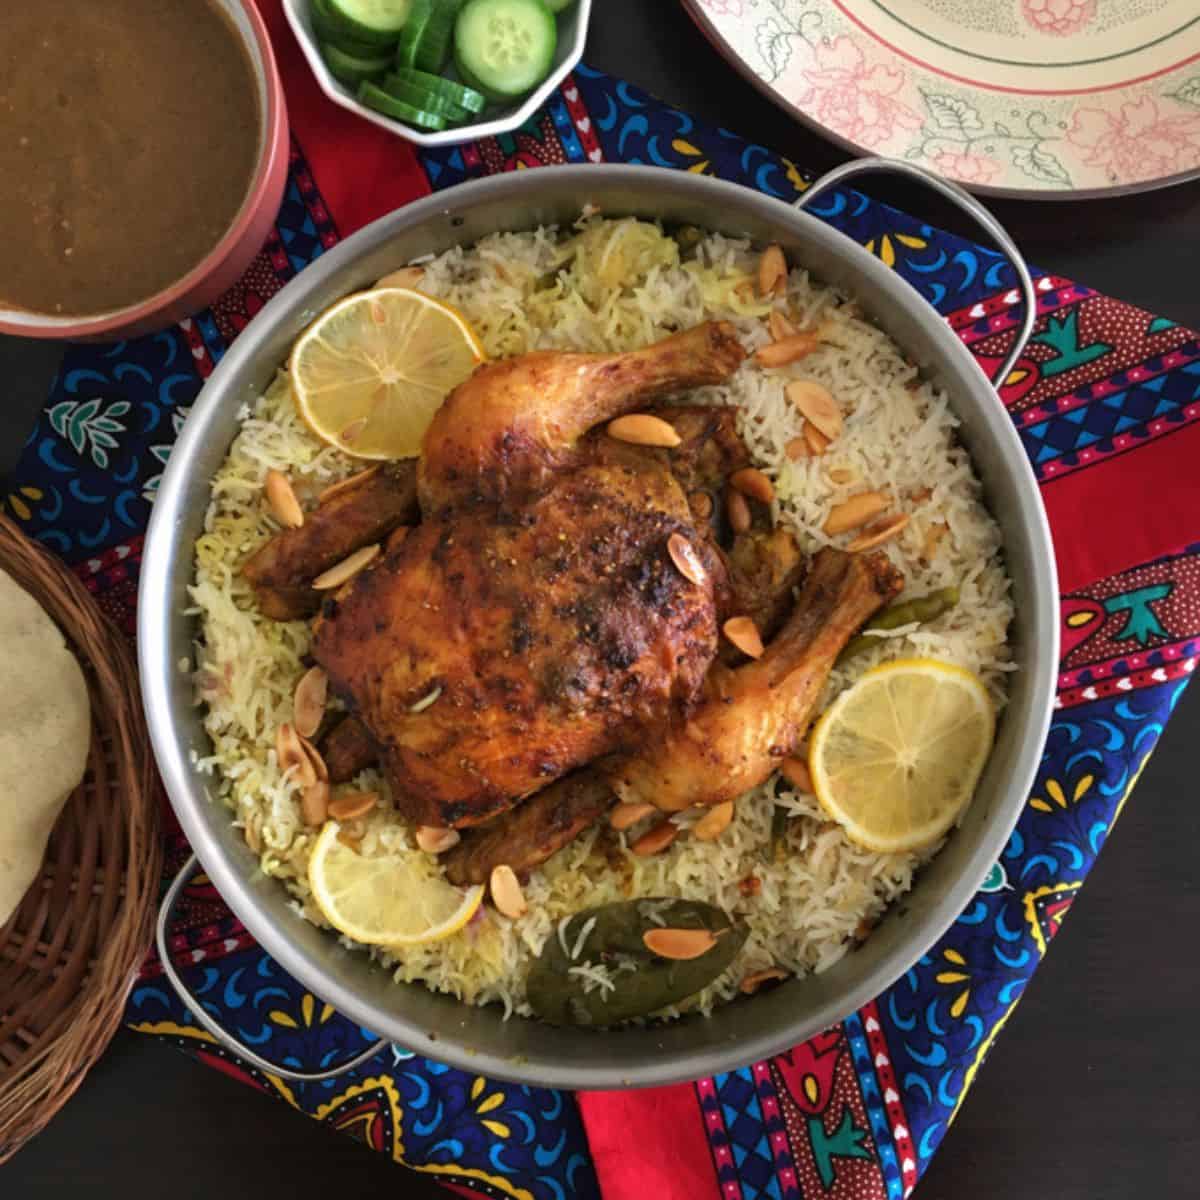
🍲How to serve tikka biryani?
Short answer: piping hot with cold raita and crispy pappadoms! But there is more to it... Here's how you can serve your homemade biryani:
- Serve along with traditional sides like raita (yoghurt dip), thinly sliced cucumber, onion and lime wedges. Raita offers a cooling effect.
- Provide condiments such as tangy mint chutney or fiery achaar (pickle).
- Offer a side salad of crisp greens dressed with lemon juice or vinegar.
- And my favourite part? Pair the biryani with beverages like sparkling lemon soda, chilled iced tea, or any fizzy juice of choice to balance the spices and the palate.
In the end, I would nudge my partner to make some warm tea while I clear the table and hit the couch. 🙂
Check some of my Indian recipes for dessert options.
🍽 Equipment
- Mixing bowl: A medium-sized bowl to marinate the chicken.
- Skewers: I use them for threading the marinated chicken pieces before grilling in a pan or oven. (optional)
- Heavy-Bottomed Pot: For cooking the biryani masala on the stovetop. I have used a 22cm wide and 7cm deep stainless steel pot with a lid.
- Tongs: For handling the hot charcoal. (optional)
- Large deep pot: For parboiling the rice. I have used a 22cm 5 qt stainless steel pot.
- Fine mesh strainer or Colander: For draining the parboiled rice.
- Heat diffuser: A heat diffuser is handy for evenly distributing heat and preventing the biryani from sticking to the bottom of the pot.
❄️ Storage
I doubt you will have any leftovers, but if you do for some reason, you can store them. To store any leftover chicken tikka biryani, transfer it to an airtight container and store it in the refrigerator for up to 3-4 days. You can reheat it in the microwave, on the stovetop, or in the oven. Add a splash of water or chicken broth to prevent the rice from drying out.
👩🏽🍳Pro Tips
There is only one chance to get the rice done perfectly. So, don't step away from keeping an eye on it while it boils. Once it starts to roll to a full boil, stay focused.
Check and stir every minute until the grains are long, firm, and slightly underdone in the centre. That's your cue to turn off the heat and promptly drain the rice. Overcooking risks turning it mushy, so timing is everything.
☝️FAQs
While both dishes feature chicken and rice cooked together with aromatic spices, chicken tikka biryani involves separately cooking the boneless chicken before layering it with rice, whereas chicken biryani involves cooking the chicken and rice together in one pot. Additionally, chicken tikka biryani often has a distinct smoky flavour from grilling the chicken tikka separately.
This chicken tikka biryani recipe is gluten-free, but always double-check labels and ingredient lists to confirm that all components are gluten-free, especially when using packaged or pre-made ingredients.
Yes! I would prepare the chicken tikka masala a day ahead and keep it refrigerated. Cooking rice won't take long, so just an hour before the serving time, I will start the rice prep and slowly reheat the tikka masala. Finally, assemble and dum cook the biryani as usual. It is always better to make the rice just before serving to keep it fresh.
Cooking time for chicken tikka biryani varies depending on the recipe and method of preparation. On average, it takes about 1 to 1.5 hours to prepare and cook chicken tikka biryani from start to finish. But if you can multi-task ( I have shared tips), you can easily get it done in less than an hour.
🍲More Related Recipes
Looking for other recipes using biryani recipes? Try these:
- One-Pot Chicken Donne Biryani Recipe
- Keema Biryani Recipe
- Machboos Rubyan (Prawns and Rice)
- Beef Rice (Erachi Choru)


Enjoyed this Recipe?
Did you know that commenting and rating recipes is one of the best ways to support your favourite food bloggers? If you tried this recipe, please leave a review in the comments with your ⭐️⭐️⭐️⭐️⭐️ rating. Your feedback enables my small business to continue offering free, high-quality recipe content for you. It is the best way to help me thrive in an increasingly competitive AI world.
📖 Recipe Card

Chicken Tikka Biryani
Ingredients
For chicken marination:
- 400 to 500 grams boneless chicken thighs, (5 to 6 thighs)
- 2 tablespoon full-fat labneh, (see notes)
- 1 tablespoon ginger garlic paste
- 1 tablespoon lime juice, (juice of half a lime)
- 1 tablespoon mustard oil, (see notes)
- 1 tablespoon Kashmiri red chilli powder
- 1 teaspoon red chilli powder
- 1 teaspoon coriander powder
- ¼ teaspoon turmeric powder
- ½ teaspoon kasuri methi
- ½ teaspoon cumin powder
- ½ teaspoon black pepper powder
- ½ teaspoon garam masala, (see notes)
- 1 teaspoon salt
For tikka biryani masala:
- 1 tablespoon cooking oil
- 1 tablespoon ghee
- 3 green cardamom
- 5 cloves
- 2 bay leaf
- 1 large onion, sliced thinly
- ½ red bell pepper, (optional)
- 2 to 3 green chillies, slit
- Fistful fresh mint leaves
- 2 teaspoon ginger garlic paste
- 1 large tomato, chopped roughly
- ¼ teaspoon turmeric powder
- 2 teaspoon red chilli powder
- 2 teaspoon coriander powder
- ½ teaspoon cumin powder
- ½ cup whisked full-fat yoghurt, room temperature
- 2 teaspoon kasuri methi
- ½ teaspoon garam masala
- ¼ cup chopped coriander leaves
For infusing smoked flavour
- 1 piece charcoal
- 1 teaspoon ghee
For biryani rice:
- 1¼ cup basmati rice
- 2 bay leaf
- 2 green chillies
- ½ inch cinnamon stick
- 2 green cardamom
- ½ teaspoon caraway seeds, (shahjeera) (optional)
- 5 cups water
- 1 tablespoon salt, (more than usual)
For assembling:
- 1 pinch saffron strands, (soaked in 2 tablespoons of hot water or warm milk) see notes
- 2 teaspoon rose water, (or kewra water)
- 2 teaspoon ghee
- chopped coriander leaves
- fried onions
- garam masala
Instructions
Marinate the chicken:
- Rinse the boneless chicken thighs under cold water and then gently pat them dry with paper towels.400 to 500 grams boneless chicken thighs (5 to 6 thighs)
- In the bowl with the chicken, add labneh (hung curd), ginger garlic paste, juice of half a lime, all the ground spices, kasuri methi, salt and mustard oil.2 tbsp full-fat labneh (see notes)1 tbsp ginger garlic paste1 tbsp lime juice (juice of half a lime)1 tbsp mustard oil (see notes)1 tbsp Kashmiri red chilli powder1 tsp red chilli powder1 tsp coriander powder¼ tsp turmeric powder½ tsp kasuri methi½ tsp cumin powder½ tsp black pepper powder½ tsp garam masala (see notes)1 tsp salt
- Using clean hands, thoroughly mix all the ingredients, ensuring that the chicken pieces are well coated with the marinade.
- Cover the mixing bowl either with plastic wrap or a lid and let it sit for an hour or refrigerate overnight.
Grill the chicken:
- If using skewers, thread the marinated chicken pieces onto them. If not, you can place the chicken directly on the grill or a lined baking sheet.
- Stove-top: Heat a grill pan on medium-high heat, drizzle cooking oil, and carefully place the skewers, avoiding overcrowding. Grill for 6-8 minutes on each side until charred. Reduce heat to medium and continue grilling until chicken is cooked through. You may partially cover the pan to avoid splattering. (see notes)
- Oven: Preheat oven to 220-250°C on hot air setting. Use a shallow ovenproof dish to suspend skewers, or line a baking tray with foil and use a wire rack. Bake in the middle rack for 20 mins, flipping skewers halfway and brushing with butter or oil.
- Remove the chicken from the oven and keep it aside.
Soak the rice:
- Rinse the basmati rice under cold water until the water runs clear.1¼ cup basmati rice
- Soak the rice in clean water for 20 to 30 minutes.
- Place a large pot of water on another hob and let it come to a boil while the masala cooks.5 cups water
Prepare tikka biryani masala:
- Heat oil in a heavy and wide-bottomed saucepot over medium heat. This will be the pot in which biryani will be assembled so we have fewer dishes to do.1 tbsp cooking oil1 tbsp ghee
- Add the whole spices and let them sizzle for a few seconds to release their aroma.3 green cardamom5 cloves2 bay leaf
- Next, add thinly sliced onions to the pan and sauté them until they turn golden brown and caramelized.1 large onion sliced thinly
- If using, add half a red bell pepper that has been thinly sliced. Stir and cook for a few minutes until the bell pepper softens slightly.½ red bell pepper (optional)
- Now, add the slit green chillies and a fistful of fresh mint leaves. Stir and cook for another minute to infuse their flavours into the mixture.2 to 3 green chillies slitFistful fresh mint leaves
- Stir in ginger garlic paste and sauté for a minute until the raw aroma disappears.2 tsp ginger garlic paste
- Next, add roughly chopped tomato along with all the ground spices and cook until it becomes soft and mushy.1 large tomato chopped roughly¼ tsp turmeric powder2 tsp red chilli powder2 tsp coriander powder½ tsp cumin powder
- Pour in the room temp whisked yoghurt and mix thoroughly.½ cup whisked full-fat yoghurt room temperature
- Allow the mixture to simmer gently for a few minutes until the oil surfaces. Meanwhile, get the charcoal ready for infusing smoky flavour.
- Stir in kasuri methi (dried fenugreek leaves) crushed between your palms and garam masala.2 tsp kasuri methi½ tsp garam masala
- Lastly, add a fistful of chopped coriander leaves and the cooked chicken pieces and mix well.¼ cup chopped coriander leaves
- Reduce the heat to the lowest and cook for 3 to 5 minutes or until the oil surfaces. Switch off the heat.
Infuse a smoky flavour (Dhungar):
- This step is optional but I highly recommend it. Take a small piece of charcoal and heat it on a direct flame until it becomes red hot. I do this on a gas stove.1 piece charcoal
- For the bowl, you can use a thick onion peel, a tiny stainless-steel bowl or like me, use a DIY foil bowl. Grab a piece of foil and shape it into a bowl by pressing it against the bottom of a tumbler.
- Place this foil cup on top of the tikka masala and pour a teaspoon of ghee into it.1 tsp ghee
- Once the charcoal is red hot, using tongs, carefully lift and place it into the foil bowl.
- You will immediately see smoke rising from the charcoal. Quickly cover the entire dish tightly with a lid or aluminium foil to trap the smoke inside.
- Let it sit for about 10 minutes to allow the masala to absorb the smoky flavour. After 5-10 minutes, open, remove and discard the cup with charcoal.
Par-boil the rice:
- Once the water in the pot starts to boil, add the whole spices, and season the water generously with salt. As we are parboiling the rice, it is essential to add more salt than usual to ensure the rice absorbs enough seasoning.2 bay leaf2 green chillies½ inch cinnamon stick2 green cardamom½ tsp caraway seeds (shahjeera) (optional)1 tbsp salt (more than usual)
- Reduce the heat to carefully add the drained rice. Turn the heat back up to high and bring back to a full boil.
- Keep an eye on the rice to ensure it does not overcook. Check the rice after 5 minutes. It should be around 90% cooked - still slightly firm but mostly tender. You can test a grain by pressing it between your fingers. It should feel soft on the outside but still have a firm centre. Once the rice reaches the desired doneness, immediately drain it into a fine mesh strainer.
Assemble the biryani pot
- Gently scatter the parboiled rice over the tikka masala evenly covering the masala.
- Drizzle the prepared saffron-infused water or milk, rose water and ghee all over the rice surface.1 pinch saffron strands (soaked in 2 tablespoons of hot water or warm milk) see notes2 tsp rose water (or kewra water)2 tsp ghee
- Sprinkle garam masala, fried onions and chopped coriander leaves.fried onionsgaram masalachopped coriander leaves
- Seal the pot with foil and then the lid. Your biryani pot is ready for low and slow-dum cooking.
Dum cook:
- Place a heat diffuser over a low flame on a large hob, then position the biryani pot on top.
- Allow it to steam cook for approximately 10 minutes before switching off the heat.
- Avoid opening the pot immediately; instead, keep it covered for an additional 5 to 8 minutes. Utilize this time to prepare a bowl of raita or fry papadums.
Serve:
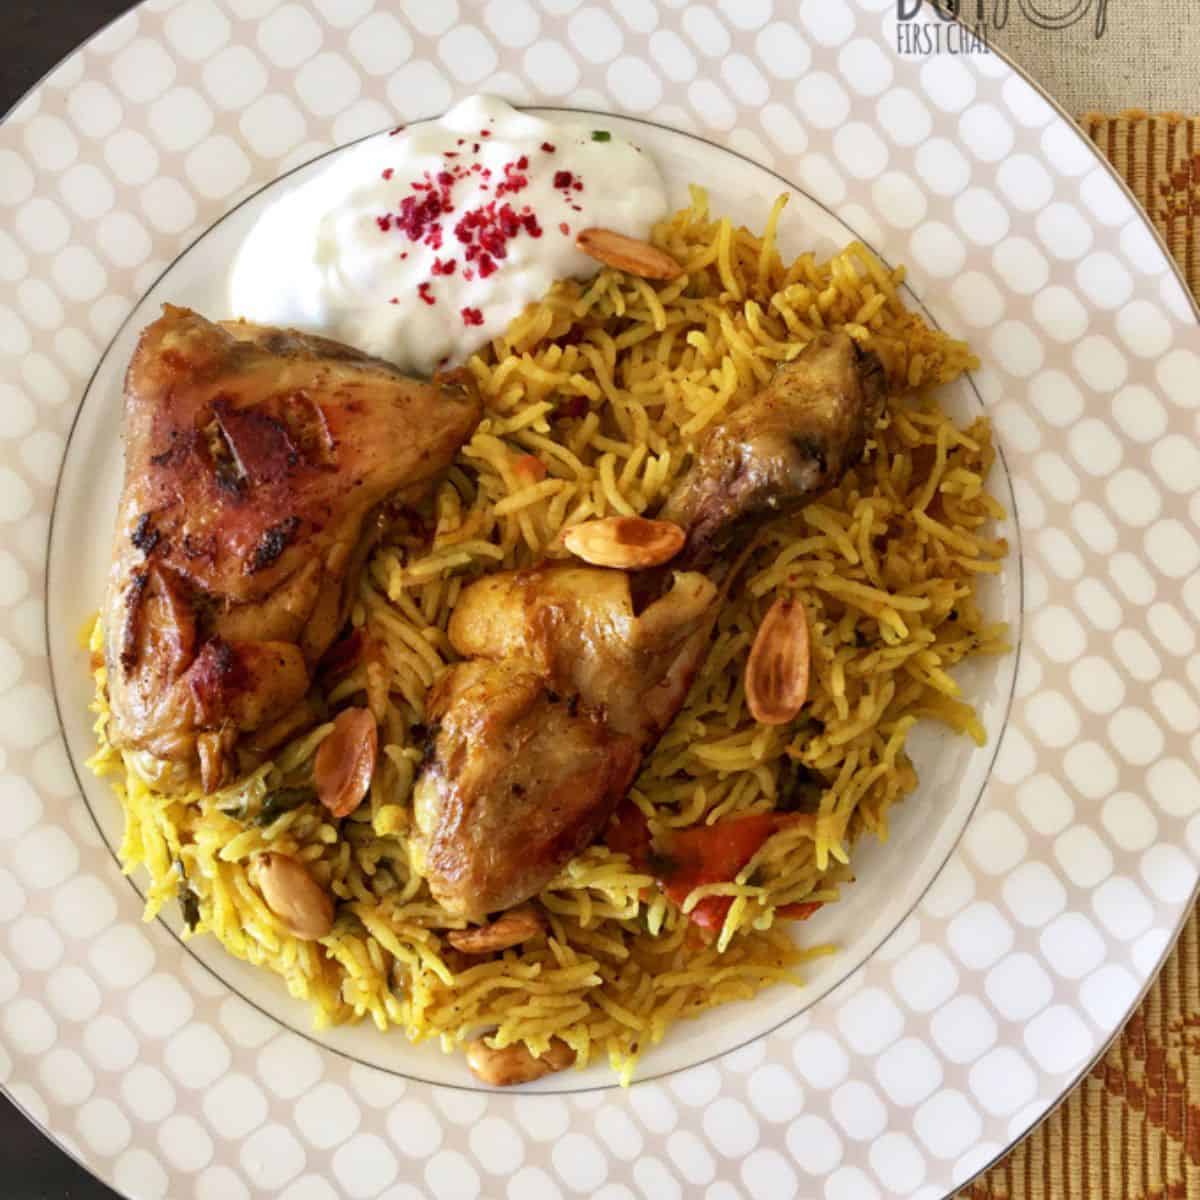
- Open the biryani pot and let the steam escape. Using a serving spoon, gently fluff the rice and spoon out the biryani onto serving plates, ensuring to distribution both rice and chicken masala evenly.
- Serve this biryani with accompaniments like raita (yoghurt-based sauce), sliced cucumbers, lemon wedges, papadums and pickles to complement the Flavors of the dish. Garnish the biryani plate with fried onions for a visual appeal.
Notes
Nutrition Info
Nutritional information is an estimate provided for informational purposes only. Values may vary based on ingredient brands, cooking methods, and portion sizes.
Leaving you with a short read about chicken tikka masala in Britannica.

Famidha Ashraf says
An easy Eid lunch for day 2 or 3 of Eid hoidays! For those who want to eat from the comfort of couch and tv, no bones to pick. 😛