
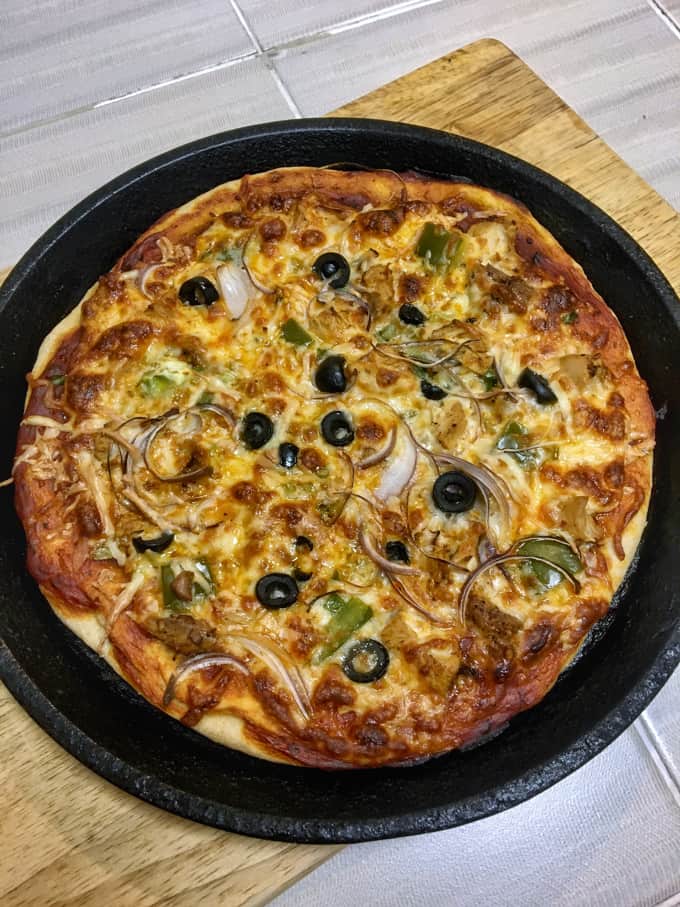
Homemade cast-iron skillet pizza using my homemade pizza dough, which makes 3 small or 1 large pizza. This recipe bakes perfectly with a puffy crust, chewy texture and crispy base.

You are either team thin and crispy or team thick and chewy, or maybe you are team any Pizza with lip-smacking toppings. This Pizza recipe can hold all kinds of your favourite toppings and still not be sloppy! But don't overdo it because, with Pizza, less is more flavour.
I had started using the cast-iron pan for most of my cooking, like in aloo gobi matar. And one of my cast-iron skillets resides on the stove. At some moment, it dawned on me that a cast-iron pan can act like a pizza stone! Now, Pizza nights are made at home!
Jump to:
📋Why you'll love this recipe?
- Pizza is always a winner, and one with a thick, chewy crust is even better. Everyone will love it!
- You can top this cast iron pizza with anything you like.
- The cast-iron skillet gives you a crispy bottom and edges.
How do I cook pizza in a cast iron skillet?
Cast iron skillets are incredibly versatile and can be used on the stovetop, in the oven, or even on a grill. This flexibility allows for various cooking methods and flavours, accommodating any pizza recipe you might want to try.
I start on the stove and finish in the preheated oven, like my Keema Naan recipe, but here we continue with the cast-iron pan. To make delicious pizza, heat the cast-iron pan on the lowest flame while you stretch the dough on the counter. Then carefully place the stretched dough on the pan and start adding the toppings. Once you are done with the toppings, move the pan to the preheated oven and bake until the cheese melts.

🥘Ingredient Notes
Let's look at what you need to make the Pizza dough and some basic items to make a pizza!
- Yeast: I always use instant yeast that resides in my fridge or freezer in a glass bottle. I add them directly to the flour. But if you are using any other yeast or are not sure if they are alive or expired, then make sure you test them before you add them to the flour.
- Water: Lukewarm water is required to activate the yeast
- Flour: I have used both all-purpose white flour and wheat flour (chakki fresh) in equal portions for this recipe. You can substitute the wheat flour with an equal portion of plain flour or bread flour.
- Oil: Use any olive oil. I have used extra virgin olive oil.
- Salt: indispensable.
- Sugar: Sugar increases the yeast's activity
- Semolina: Not in the dough, but it is used to dust the board while stretching the dough, thereby making the pizza crust crisp. Generally, you will find recipes using cornmeal for this step.
🔪Steps to make cast-iron skillet pizza
Scroll down for the recipe card.
I use a 1 cup = 250ml measuring cup set. Fluff and scoop the flour and sweep with the blunt side of the knife to remove the excess.
I have used both plain all-purpose flour (maida) and wheat flour (atta), but you can use all apf (maida) too.

Take a large bowl and add flour, yeast, sugar and salt and mix thoroughly using a whisk.

Make a well in the centre and pour in oil and water.

Do not use your hands to knead now. If you do, you will end up using more flour and have messy fingers.
Use a wooden spoon or rubber spatula to mix until it starts to form a dough that comes away from the side of the bowl.

Dust and knead the dough for a minimum of 10 minutes until smooth but slightly sticky.
Do not use more flour while kneading. Shape the dough into a ball by pulling and tucking behind.

Grease the bowl with olive oil. Place the dough in and turn it over to coat the dough entirely with oil. Cover with cling wrap and place in a warm place for 1 to 2 hours or until it doubles in size.

You may keep it in the refrigerator for an overnight slow rise, which I did. You may use this dough to make one large pizza.

Deflate the dough and make three equal-sized portions. Knead lightly and make smooth balls. Keep them covered with a lightly damp tea towel.
TIP: If you plan to bake only one or two pizzas, then you can refrigerate or freeze the remaining dough in a ziplock bag or container. Bring them to room temp before you use them.

Let the dough balls rise in a warm place for 2 hours or until almost doubled in size.
TIP: Keep all your pizza topping ingredients ready to use. It is best to use cooked meat and roasted veggies. I love to use thinly sliced raw onions and peppers. You can use leftover kebabs, buffalo sauce chicken, pan-fried sausages, grilled chicken tikka, bbq chicken, etc.

Preheat the oven to at least 275°C, or as high as your oven will go. Place the wire rack in the middle. Heat a cast-iron pan on the largest burner with the lowest flame on the stovetop.

Sprinkle the work surface with semolina. Deflate and flatten the dough into a disc using fingertips, but keeping the edge of the dough untouched. Form a border wall by keeping the edge thicker while spreading the inside until it's almost the size of a 9-inch cast-iron or pizza pan. You can watch Laura stretch the dough that helped me a lot.

If your cast iron is new and still has not formed the non-stick feature, then lightly grease the pan. Then slide the stretched pizza dough onto the hot cast-iron pan. You may lift carefully and place it on the hot pan.
While the stretched pizza sits on the hot cast-iron pan on the lowest flame, it starts to cook. You may switch it off if it has become too hot.

Start to spread the toppings in the order as quickly as you can, making sure to spare the edges.
- pizza sauce
- grated mozzarella
- cooked chicken or meat pieces or roasted veggies
- more mozzarella cheese and chilli flakes
- Brush olive oil all around the edge

You will notice the pizza has started to cook while it sits on the hot cast-iron pan. Now, use an oven mitt and move the cast-iron pan into the preheated oven. If you do not have an oven, continue cooking the pizza on the skillet, but cover and cook until the cheese melts.

Bake for 12 to 15 minutes or until cheese is melted, bubbly and has some golden spots. Remove from the oven and use a flat spatula, like a dosa-turner, to remove the pizza from the pan to the serving plate. Cut into wedges, and serve immediately!

❄️Storage
Place the leftover slices wrapped in foil or in an airtight container. Store the container in the refrigerator for up to 3-4 days. For best results, reheat the pizza in the skillet on the stovetop or in the oven to maintain its crispy crust. Avoid using the microwave, as it can make the crust chewy.
☝️Frequently Asked Questions
Yes, you can freeze the pizza. Wrap the slices tightly in plastic wrap, then foil, or place them in a freezer-safe container. Freeze for up to 2 months. Thaw in the refrigerator before reheating.
My recipe recommends preheating the skillet on the stove-top, and once assembled, you move it to the oven. I like this version more than simply pressing the dough into the skillet and adding toppings.
Related Recipes


Enjoyed this Recipe?
Did you know that commenting and rating recipes is one of the best ways to support your favourite food bloggers? If you tried this recipe, please leave a review in the comments with your ⭐️⭐️⭐️⭐️⭐️ rating. Your feedback enables my small business to continue offering free, high-quality recipe content for you. It is the best way to help me thrive in an increasingly competitive AI world.
📖 Recipe Card

Cast-iron Skillet Pizza
Equipment
- 1 cast iron pan, 8 inch or 9 inch
Ingredients
For Pizza dough
- 1 cup all-purpose flour, maida
- 1 cup whole wheat flour
- 1 teaspoon instant yeast
- 2 teaspoons sugar
- 1 teaspoon salt
- 2 tablespoon olive oil
- ¾ cup lukewarm water
Others
- 1 tablespoon flour , (used while kneading)
- 1 tablespoon olive oil , for greasing and brushing
- semolina , used while shaping
Pizza Toppings
- 3 to 4 tablespoons pizza sauce , per pizza
- ½ cup shredded mozzarella cheese , per pizza
Instructions
Prepare the pizza dough
- Take a large bowl and add flour, yeast, sugar and salt and mix thoroughly using a whisk. Make a well in the centre and pour the oil and water. Use a wooden spoon or rubber spatula to mix until it starts to form a dough that comes away from the side of the bowl.1 cup all-purpose flour maida1 cup whole wheat flour1 teaspoon instant yeast2 teaspoons sugar1 teaspoon salt2 tablespoon olive oil¾ cup lukewarm water
- Dust your palms with flour and sprinkle some on the work surface and start kneading the dough. Keep a timer for 10 minutes and knead until smooth but slightly sticky. Do not use more flour while kneading. Stick to the recipe.1 tablespoon flour (used while kneading)
Rise 1
- Grease the same bowl with olive oil. Place the dough in and turn it over to coat the dough entirely with oil. Cover with cling wrap and place in a warm place for 1 - 2 hours or until it doubles in size. You may keep it in the refrigerator for an overnight slow-rise.1 tablespoon olive oil for greasing and brushing
- Use this dough to make one large pizza or deflate it and make two or three equal-sized portions. I made three approximately 170g each (you can make a log and cut equally or weigh the dough and divide by 3).
Rise 2
- Knead lightly and make smooth-topped dough balls. Keep them covered with a lightly damp tea towel. Let it rise in a warm place for an hour or until almost doubled in size.
Keep pizza toppings ready to use
- Once we stretch the pizza, we cannot spend time looking for or prepping the toppings. So it is best practice to make sure you have your toppings all prepared before you start the pizza making. Chop onions, bell peppers, olives, etc. Prepare your choice of chicken, beef, veggies, etc and let it cool so you can handle it. Grate the cheese if using block mozzarella.
Prep oven and pan
- Preheat the oven to at least 275°C, or as high as your oven will go. Place the wire rack in the middle. Heat a cast-iron pan on the largest burner with the lowest flame on the stovetop.
Shape
- Sprinkle the work surface with semolina or cornmeal. Take a dough ball (keep the rest always covered) and dredge it lightly in flour on all sides. Deflate and flatten the dough into a disc using your fingertips or rolling pin.semolina used while shaping
- Place both your palms inside the ridge. Keep your left palm stationary while you spread the dough with your right palm. Rotate the dough while your stretch. Avoid tearing the dough, if you do manage to make a hole, don't fret. Just pinch that portion and go easy on the toppings.
- Form a border wall by keeping the edge thicker while spreading the inside until it is almost the size of a 9-inch cast-iron or pizza pan. Then slide the stretched pizza dough onto the hot cast-iron pan.
Add toppings
- Start to spread the toppings in the order as quickly as you can making sure to spare the edges. Begin with Pizza sauce, grated mozzarella, cooked chicken or meat pieces or roasted veggies, more mozzarella cheese and chilli flakes. You may add some sliced raw onions and thinly cut bell peppers, and olives, Lastly, brush olive oil all around the edge.3 to 4 tablespoons pizza sauce per pizza½ cup shredded mozzarella cheese per pizza
Start on stove
- You will notice the pizza has started to cook while on the hot cast-iron pan. Now, use an oven mitten and move the cast-iron pan into the preheated oven. If you do not have an oven, continue cooking the pizza on the skillet but cover and cook until the cheese melts.
Finish in oven
- Bake for 12 to 15 minutes or until cheese is melted, bubbly and has some golden spots. Remove from the oven and use a flat spatula, like a dosa-turner to remove the pizza from the pan tothe serving plate. Cut into wedges, and serve immediately! Repeat with the remaining two dough balls or freeze the dough for later.
Nutrition Info
Nutritional information is an estimate provided for informational purposes only. Values may vary based on ingredient brands, cooking methods, and portion sizes.

Famidha Ashraf says
Pizza nights are fun when you can make everything from scratch and customize to each one's liking. A family bonding time!